Tips and Tricks
If you are new to PsxCad, you may feel a little overwhelmed by the number of screens, options, tools and icons you see on the screen. Here are some tips and tricks to help you get started and make the most of your experience.
Search and Replace tool
The Search and Replace tool is a fast, easy to use utility to perform search and replace operations across multiple text-based fields, including (but not limited to) ID-tags, (default) values and boolean states.
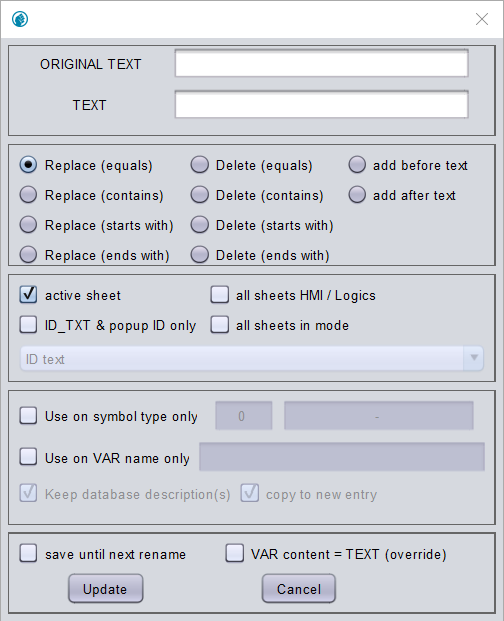
You can utilize the Search and Replace tool in two ways:
-
Using the Alt + R key combination
-
Right-mouse click on any logic or drawing sheet, then select .
Search and Replace tool section for detailed instructions on how to use this utility.
Include and exclude pages

It is possible to exclude or include pages by pressing right-click on a page in the navigator window.
Select in the dropdown menu .
When a page is excluded it’s icon changes to the icon shown in figure 1.
When excluding a page it will not be taken into account while running PsxCad in runtime. The runtime program runs as if these pages never existed. This will come in handy while troubleshooting for errors. You can make eliminations for where the problem occurs or not by excluding pages. Excluding pages will come in handy when you want to make some tests in your project and want to disable the original design or when you want to keep examples of another project at hand without including them in your project.
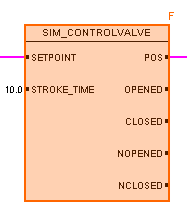
Usage of typicals

Typicals are very useful when there are repeatable functionalities in your project. The typical generates a symbol that can be used throughout the whole project. Programming with typical makes a clear overview of the repeating functionality. See figure 2 for its icon.
Copying symbols to other pages
When you want duplicates of some specific group of symbols with slight changes in de ID tag names on different pages follow the following steps:
-
You can select a the group of symbols and copy them with Alt C
-
Press escape to be able to switch to other pages or screens
-
On another page or screen use the short-key Alt V
-
Right after that press the enter key without moving your mouse
-
Now the copied symbols will paste on the exact same coordinates as the page it was copied from
-
Adjust the conserved ID tags of the symbols you copied with the search & replace function Alt R
Auto trendline function
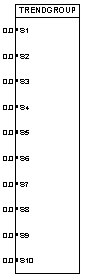
For a quick start in making trends in PsxCad without having to go through the trouble of designing charts, it is possible to make usage of the auto trend line function in PsxCad. For this you need the symbol "TRENDGROUP" and place a signal of choice on its inputs. Give the symbol an ID tag for good reference.
You can use any symbol as a button to generate the auto trend function from this block by giving the symbol the same tag name as the specific "TRENDGROUP" symbol and place the command "&KEY&259" in the text field of 'ID text (commands)'.
For quick use you can just place the "&KEY&259" command directly on the "TRENDGROUP" symbol.
Locking background layers
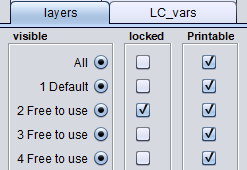
When symbols are placed upon each other a selection menu appears for selection of the right symbol. This can be troublesome when using some symbols as a background and it repeatedly appears while selecting symbols.
This issue can be handled by placing all the background symbols in a certain layer with the symbols parameters menu on button E and to lock that layer under the layers tab.
This way the symbols on that layer are disabled for selection and will be shown slightly transparent on the screen. This feature is ideal for when we want to trace a drawing on the screen.
Colour table
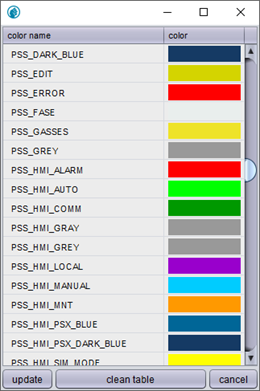
For easy use of colouring throughout your project a colour table option is built in PsxCad. Colour references can be made in the colour table by pressing insert while the colour table window is selected. A reference is removable by pressing delete.
Using these references throughout the development of the project makes it easier to adjust the colour settings in a later stage of the project.
Show content
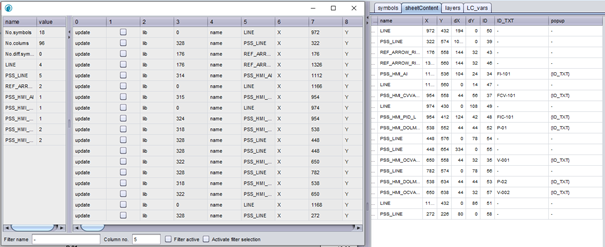
Go to to show a window with all the content of the current sheet. For each symbol on the page there is a list of the same properties that is shown with the short-key E for the symbol parameters. Under the tab sheetContent there is an abridged version of the sheet content. This list makes it easier for editing symbols and for getting an overview of all the symbols on this page.
X/Y coordinates

To make sure a line has a straight draw you can check the dX and dY coordinates in the symbol parameters by pressing E on a symbol. These are the parameters for the width and height of the symbol. If one of them is zero you can be sure the line has a straight draw. The X/Y coordinates are also easy to change here.
Init, Save and load session

When in runtime there are a few options that are useful while testing your simulation program. PsxCad holds a database in the background that is adjusted in real-time according to the simulation. PsxCad remembers the initial state of the database. To return to the initial state of your data base press Init and your simulation begins anew. To let PsxCad remember your current state of database as a new initial state press Session -→ write init values DB. If you want to save your current state of database without overwriting the remembered initial state you can save the current database by pressing Save session. To load the database from a saved session press Load session. These feature makes it easier to analyse your simulator. For example, if you have a simulator that takes quite a while for starting up you can save your session after the start up and save sometime because you don’t have to start up the whole system again when you restart your simulator.
Adding a breakpoint

It is possible to make a breakpoint depending on the condition of a certain ID tag value. When the condition is met the simulator will pause its operations. To enable this feature in PsxCad check the box pause list active in the runtime controller. Now the simulator will pause when a condition in the pause list is active. To add a condition to the pause list hover your cursor on a symbol with the desired ID tag and press F10. After a condition is added, it can be adjusted under the SIM_Pause tab on the runtime controller by changing the compare function and value.
RT debug mode

Some projects allow for a debug mode to be used. This mode requires some special requirements to be available.
When runtime debug mode is active the button colours orange. While in debug mode it is possible to bypass a symbol’s functions and force output signals through this symbol. To set a symbol in debug mode press F9 and the symbol will highlight as shown in the example below. This visualization may differ at each project.
Project Overview
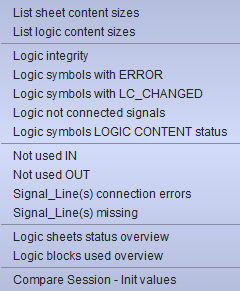
overview in the menu bar there is a dropdown list of tools which are useful for analysing your project. These tools have functions such as scanning your project for amount of symbols, integrity errors, connection errors, unusual occursions, missing lines or connections and not used in-/outputs. There is even a function for comparing a saved session with your current database.
Troubleshooting tips
-
Next to the text-field of the controller for runtime there is a terminal window where people can find causes of problems
-
The text-field of the controller for runtime has a show extra messages checkbox which provides more information.
Dropdown menu for key-functions
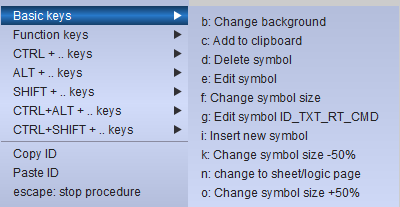
While in editor mode pressing right mouse-click in the drawing area will dropdown a menu list with all possible function to execute. The short-keys of these functions are also shown on the menu list.
Frequently used short-keys
Keyboard Shortcuts section for all shortcuts.
Shortcuts in editor-mode
In PsxCad, right-click on your screen, logic or cadre sheet to open the “Keyboard Shortcuts” window.
Available in mode |
|||
Shortcut |
Action |
Logic |
Screen/cadre |
C |
Add to clipboard |
✓ |
✓ |
D |
Delete symbol |
✓ |
✓ |
E |
Edit symbol |
✓ |
✓ |
F |
Change symbol size |
✓ |
✓ |
G |
Edit symbol ID text, description, runtime navigation and popup data |
✓ |
✓ |
H |
Autodraw horizontal line |
✓ |
|
I |
Open symbol library |
✓ |
✓ |
J |
Edit symbol logic content |
✓ |
|
K |
Change symbol size -50% |
✓ |
✓ |
L |
Logics drawing signal |
✓ |
|
M |
Move line (rubber banding) |
✓ |
|
R |
Repeat last draw function |
✓ |
✓ |
T |
Draw transition arrows |
✓ |
|
W |
Autodraw vertical line |
✓ |
|
X |
Restore logic content to symbol library default |
✓ |
|
Y |
Save symbol logic content as new library default |
✓ |
|
Z |
Search name usages |
✓ |
✓ |
1 |
Change IN-signal to a boolean |
✓ |
|
2 |
Change IN-signal to an integer |
✓ |
|
3 |
Change IN-signal to a double |
✓ |
|
4 |
Change IN-signal to an object |
✓ |
|
Escape |
Stop procedure |
✓ |
✓ |
F1 |
Copy to parameter clipboard |
✓ |
✓ |
F2 |
Open extra view-only editor window |
✓ |
✓ |
F5 |
Paste from parameter clipboard |
✓ |
✓ |
F7 |
Open symbol editor |
✓ |
✓ |
Ctrl R |
Replace symbol(s) |
✓ |
✓ |
Ctrl Z |
Search symbol name in sheets |
✓ |
|
Ctrl (Keypad) + |
Zoom in |
✓ |
✓ |
Ctrl (Keypad) – |
Zoom out |
✓ |
✓ |
Alt C |
Copy to clipboard, keep ID names |
✓ |
✓ |
Alt I |
Convert IN > OUT or OUT > IN [keep ID tag]. |
✓ |
|
Alt O |
X/Y-offset selected symbols |
✓ |
✓ |
Alt R |
Rename ID & popup tekst |
✓ |
✓ |
Alt S |
Save sheet as symbol |
✓ |
✓ |
Alt V |
Paste from clipboard [keep ID tag]. |
✓ |
✓ |
Shift I |
Invert signal line |
✓ |
|
Shift V |
Paste symbol in clipboard with forced X or Y coordinate |
✓ |
✓ |
Ctrl Alt K |
Change to cadres |
✓ |
✓ |
Ctrl Alt L |
Change to logics |
✓ |
|
Ctrl Alt M |
Change to sheets |
✓ |
|
Ctrl Shift N |
Select symbol by name |
✓ |
✓ |
Ctrl Shift Z |
Search ID in database |
✓ |
✓ |
Shortcuts in runtime-mode
| The runtime shortcuts below are default shortcuts. PsxCad lets you change the keyboard shortcut for functions used in Runtime mode, meaning these shortcuts may not function in case they have been changed before. You can always revert back to default settings or set a new keyboard shortcut you prefer. |
Shortcut |
Action |
F2 |
Show window for screen selection |
F4 |
Adjust value |
F10 |
Add ID tag to pause list |
F12 |
Stop runtime |
Alt L |
Open PsxCad logic mode |
Alt N |
New window |
Shift T |
Toggle Boolean signal |