Getting started running a simulation
On this page a tutorial on how to get started in running a simulation in PsxCad. This tutorial includes two versions of PsxCad, which are the runtime-only version of PsxCad with a runtime license and the full version of PsxCad with a professional license.
PsxCad with runtime license
Startup Guide
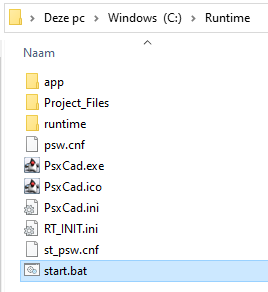
To launch PsxCad in runtime-only mode, you need to use a start-up file. If Powerspex has provided you with a project and performed the installation, the batch file you need should be named "start.bat," located in the "C:\Runtime" directory.
Alternatively, you can create your own start-up file by following instructions at Create a start-up file for opening a project.
Create a start-up file for opening a project
To launch a project with PsxCad in runtime-only mode, create a startup file with these steps:
-
Create a new text document.
-
Insert this code using a text editor:
PsxCad.exe -RT:C:\Runtime\Project_Files\"File name".jdxReplace file name and the path with your PsxCad project’s details.
-
Save the file with a ".bat" extension.
-
Execute the batch file to open your project.
Now, you can open your PsxCad project using this batch file.
Using the Simulator Control Box
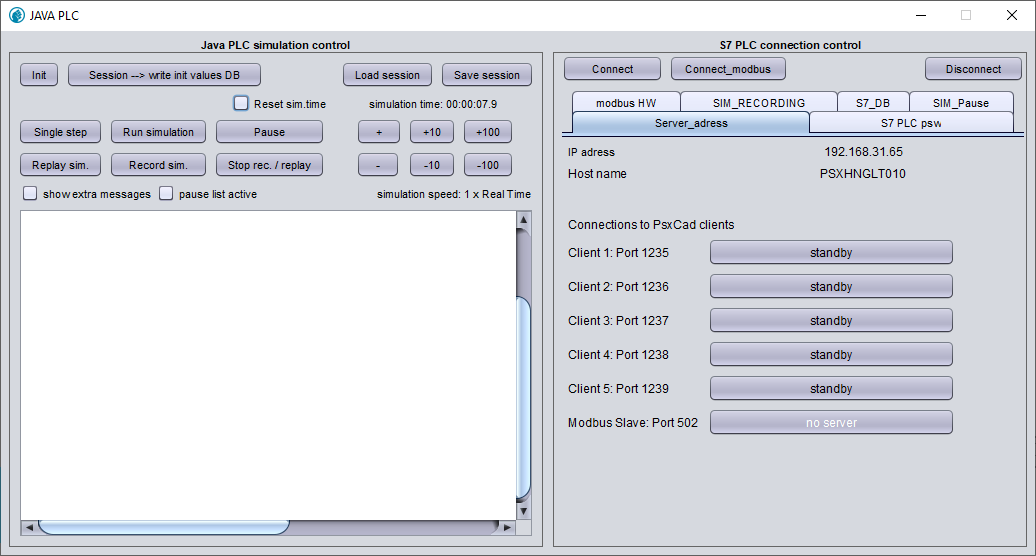
The PsxCad simulator’s control box is a crucial tool for managing your simulation. Here are some important bullet points on its usage:
-
Monitoring Simulation Time: Keep an eye on the simulation time displayed to determine whether the simulator is actively running. Below this, you’ll discover six buttons for adjusting the simulation speed, along with a textual indicator of the current simulation speed.
-
Logging and Debug Console: PsxCad uses a dedicated text field in the control box to report any errors or important messages during the simulation.
-
Running and Pausing: Control the simulation with the following buttons:


Running your simulation in runtime mode will frequently update its database on each scan cycle. The state of this database is called a session.
-
Resetting to Initial Session: To return to the simulation’s initial state, press the
 button. Be aware that your current progress will be lost.
 -
Updating Initial Session: You can update the initial session from which the simulation starts by pressing the
 . Your current progress will be saved, allowing you to resume from this point the next time you start runtime mode.
 -
Saving sessions: Don’t confuse previous button with the
 button next to it.
This one will save your current session as a file that can be stored in a location of your choice.
button next to it.
This one will save your current session as a file that can be stored in a location of your choice. -
Saving sessions: Use the
 button to load a saved session from a file into the database. This function is handy for setting and returning to specific scenarios.
For more detailed information on the control box during simulation at runtime, refer to the extensive documentation available by clicking here.
Navigating and Searching
| Please note that the use of keyboard shortcuts mentioned in the following paragraphs is subject to customization in PsxCad’s Runtime mode. While the default shortcuts are discussed here, they may vary in different projects. Refer to Using Keyboard Shortcuts for additional information on this. |
When navigating within PsxCad RunTime mode, you’ll often find navigation buttons on the HMI screen for easy screen-to-screen movement. However, if you ever feel disoriented or encounter difficulty reaching a specific screen, consider using the F2 shortcut to summon the built-in navigator window. Here, you can select the HMI screen you wish to navigate to.
For managing HMI screens, you can open multiple windows simultaneously using the Alt N shortcut.
To access a window displaying logic pages, use the Alt L shortcut. This window features a convenient navigator docked on the left side, allowing you to select and navigate to various logic pages.
When you need to cross-reference a tag associated with a symbol and discover where else that tag is used, utilize the Z shortcut. This will open a window displaying cross-references related to that tag. You can also use this feature to switch between graphic screens and logic pages, making it invaluable for troubleshooting or studying the code.
Using Keyboard Shortcuts
For beginners, here are some essential key functions to highlight. Please note that these are based on the default settings and can be adjusted as needed. Refer to the table below for an overview.
Additionally we also included the shortkeys from the previous paragraph in the table below.
| Shortcut | Number | Function Description |
|---|---|---|
J |
25 |
Logic content window |
Z |
222 |
Open search tool |
Alt N |
229 |
Open new window |
Alt L |
248 |
Description |
Shift T |
211 |
Toggle boolean signal |
F2 |
217 |
Open navigation tree window |
F4 |
210 |
Adjust signal value |
F12 |
254 |
Exit RunTime mode |
*Note that you need to hover your cursor over a symbol to apply the shortcut to that symbol.
For comprehensive documentation on all keyboard shortcuts, click here.
PsxCad with professional license
Startup Guide
To open PsxCad, you must first complete the installation process by following the installation instructions. Once PsxCad is installed correctly, you’ll find a desktop shortcut with the Powerspex icon. Simply double-click this shortcut to launch PsxCad.

You can also open PsxCad using alternative methods, such as using the Windows search bar or locating the PsxCad.exe file in the installation directory (usually C:\PsxCad\).
| Opening PsxCad from a .jdx file is not supported. |
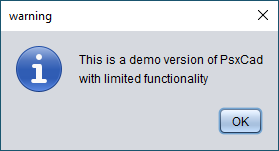
If you encounter a warning message indicating that this is a demo version, it means you’re trying to use PsxCad without an active license. You can still access PsxCad with limited functionality as a trial.
If this is not the experience you expected, your license may not have been activated or may have expired. Please contact Powerspex to purchase a license and then follow the instructions for license activation here.
Opening a Project in PsxCad
Once PsxCad is running, you can easily open a project of your choice. Follow these steps:
-
In the menu, navigate to .
-
A pop-up will appear, asking if you want to save your current project. You can either save it or click No.
-
Next, a selection menu will appear, allowing you to browse your computer files. Choose a project with a .jdx file extension.
-
Finally, press Open to open the selected project.
| Be cautious not to accidentally click Yes in the save prompt. This could lead to mistakenly overwriting the project you intended to open, resulting in data loss. |
PsxCad also offers a quick way to open your most recently worked-on project. You can do this by clicking the button in the toolbar labeled F9: some_project_name.jdx (refer to Figure 5) or by using the shortcut F9. This action will trigger a pop-up confirmation to reload the last opened file. Click Yes to proceed.

Transitioning to Runtime Mode
After opening a project in PsxCad, it initially opens in editor mode, allowing you to make adjustments. To run your project, follow these steps:
-
Navigate to in the menu bar.
-
A pop-up will appear, prompting you to synchronize the database with your current logic pages. This update ensures that the runtime database includes the latest added tags from the logic pages. Click Yes or No to proceed.
Once you’ve completed these steps, your project will be in runtime mode, and you’ll see a control box appear. Additionally, another pop-up will ask if you want to load screens left open from your previous session. Here are your options:
-
Clicking Yes will result in PsxCad opening the screens exactly as they were in your previous runtime session.
-
Clicking No will result in PsxCad opening the screen that is selected as the main screen in its settings.
Now, you can work on your project in runtime mode.
Using the Simulator Control Box
The PsxCad simulator’s control box is a crucial tool for managing your simulation. Here are some important bullet points on its usage:
-
Monitoring Simulation Time: Keep an eye on the simulation time displayed to determine whether the simulator is actively running. Below this, you’ll discover six buttons for adjusting the simulation speed, along with a textual indicator of the current simulation speed.
-
Logging and Debug Console: PsxCad uses a dedicated text field in the control box to report any errors or important messages during the simulation.
-
Running and Pausing: Control the simulation with the following buttons:
Running your simulation in runtime mode will frequently update its database on each scan cycle. The state of this database is called a session.
-
Resetting to Initial Session: To return to the simulation’s initial state, press the
button. Be aware that your current progress will be lost. -
Updating Initial Session: You can update the initial session from which the simulation starts by pressing the
. Your current progress will be saved, allowing you to resume from this point the next time you start runtime mode. -
Saving sessions: Don’t confuse previous button with the
button next to it.
This one will save your current session as a file that can be stored in a location of your choice. -
Saving sessions: Use the
button to load a saved session from a file into the database. This function is handy for setting and returning to specific scenarios.
For more detailed information on the control box during simulation at runtime, refer to the extensive documentation available by clicking here.
Navigating and Searching
| Please note that the use of keyboard shortcuts mentioned in the following paragraphs is subject to customization in PsxCad’s Runtime mode. While the default shortcuts are discussed here, they may vary in different projects. Refer to Using Keyboard Shortcuts for additional information on this. |
When navigating within PsxCad RunTime mode, you’ll often find navigation buttons on the HMI screen for easy screen-to-screen movement. However, if you ever feel disoriented or encounter difficulty reaching a specific screen, consider using the F2 shortcut to summon the built-in navigator window. Here, you can select the HMI screen you wish to navigate to.
For managing HMI screens, you can open multiple windows simultaneously using the Alt N shortcut.
To access a window displaying logic pages, use the Alt L shortcut. This window features a convenient navigator docked on the left side, allowing you to select and navigate to various logic pages.
When you need to cross-reference a tag associated with a symbol and discover where else that tag is used, utilize the Z shortcut. This will open a window displaying cross-references related to that tag. You can also use this feature to switch between graphic screens and logic pages, making it invaluable for troubleshooting or studying the code.
Using Keyboard Shortcuts
Keyboard shortcuts in RunTime mode can be customized to meet specific project needs. To manage keyboard combinations in editor mode, follow these steps:
-
Go to in the menu bar. This will open a window with three available tabs.
-
Click the Mouse/Keyboard tab, where you’ll find a list of possible keyboard and mouse combinations, each associated with a number or combination of numbers. These numbers serve as references to specific mouse and key functions in RunTime mode. You can adjust these numbers to change the functions assigned to key combinations.
-
To further customize your shortcuts, select a combination and click Mouse/Key action wizard. This opens a new window displaying a list of mouse and key functions along with their reference numbers. Here, you can choose the functions you want to assign to the selected key combination by checking the corresponding checkboxes and clicking the Update button.
For beginners, here are some essential key functions to highlight. Please note that these are based on the default settings and can be adjusted as needed. Refer to the table below for an overview.
Additionally we also included the shortkeys from the previous paragraph in the table below.
| Shortcut | Number | Function Description |
|---|---|---|
J |
25 |
Logic content window |
Z |
222 |
Open search tool |
Alt N |
229 |
Open new window |
Alt L |
248 |
Description |
Shift T |
211 |
Toggle boolean signal |
F2 |
217 |
Open navigation tree window |
F4 |
210 |
Adjust signal value |
F12 |
254 |
Exit RunTime mode |
*Note that you need to hover your cursor over a symbol to apply the shortcut to that symbol.
For comprehensive documentation on all keyboard shortcuts, click here.
Exiting the Program
To exit Runtime mode, you have three options:
-
Click the X in the top right corner of the control box.
-
Close all open windows.
-
Use the keyboard shortcut F12.
These actions will return you to the editor’s mode. For exiting editor’s mode, follow these steps:
-
Navigate to in the menu bar.
-
Click the X in the top right corner of PsxCad’s main user interface.
PsxCad will prompt you to confirm the saving of your project before closing.